 |
| Tutorial and inspiration for making cards on the computer |
How to make a horizontal format quarter-fold card (opens from bottom) using 11 x 8.5" paper and a computer word-processing program such as Microsoft Word.
Start with a blank document, under layout and page setup, choose landscape orientation (wider than tall). To understand the layout, make a prototype using plain or scratch paper—called mockup a dummy in the graphic arts industry.
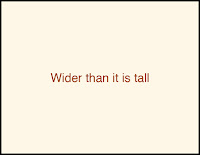 |
| Hold the paper in front of you so it is wider than it is tall. |
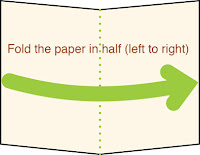 |
| First, fold the paper in half (left to right) |
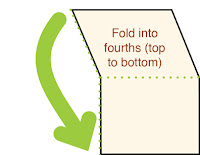 |
| Next, fold into fourths (top to bottom) |
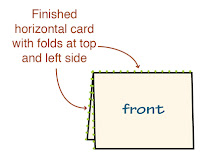 |
| Sketch the word “front” on the panel that has a fold edge on the long top and the short left side |
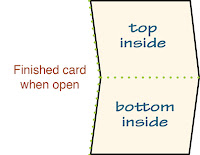 |
| Lift the cover up to open and sketch the word “inside” or “top” and “bottom” |
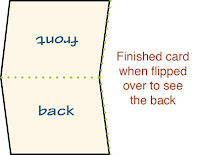 |
| Turn it over and sketch the word “back”—the open edge is on bottom. |
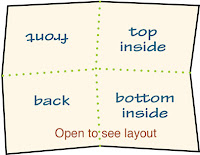 |
| Unfold the paper and lay it flat (with direction of “front” panel upside
down). Follow this layout to set up the card in the program you use. |
-
For best results, use the program’s Draw tools to create text boxes
instead of typing straight to the page. Draw tools allow you to move the
boxes around the page. Use the Flip or Rotate command to turn the cover
art upside down to match your dummy. Consult your software program’s
help file for more information.
- You may want to test it by printing a trial sheet
on plain paper before printing on the high-quality stationery paper.
- Save the completed file. Make a folder to store clip art and your saved page file for future editing and re-use.
- If you don’t have a printer, drag your file to a thumb drive or CD and bring to another place such as library or printing service provider—or attach it to an email to transfer for printing. Check fonts before printing from another device.
- After printing, fold it in half and then into fourths to match
the dummy you mocked-up. Sign and slip card into a matching stationery envelope.
Ideas for making greeting cards
- Printable card digital clip art for all occasions is available in the stationery paper section of FreshRetroGallery. These illustrations serve as a “digital rubber stamp” to have on hand to use whenever and as often as you need them for journaling, scrapbooking, making tags, card making, posters, etc. Standard size white or fancy paper can be folded in fourths to fit in A2 baronial envelopes.
- Traditional rubber stamps
- Colored pencils, markers, crayons, gel pen original sketches or to enhance printed or stamped art
- Stickers—foil, embossed, printed
- Up-cycle with clippings from old cards, photos, layers of torn colored paper, lace, rick-rack, ribbon, etc. These can be added with glue stick.
- The inside bottom is where you put poetry or write personal notes. Handwriting your message is a lovely option, yet, using your computer with fonts you choose gives a polished look. The tutorial above shows how to do this, printing only one side of the sheet.
- Bible verse on the top inside flap.
- Your name and date on back.
- Cards are attractive as horizontal format with a flip-up cover page. Vertical format (open like a book) is appropriate if cover art design fits that shape. See instructions below.
How to create a vertical format quarter-fold card that opens like a book
Instructions for vertical cards
are similar to the horizontal version explained above except use the
standard 8.5" wide x 11" tall document orientation and different folding
order. Make a dummy, first folding top to bottom and then folding left to right. Mark “front” on the panel that has a fold edge on the long-side and
short-top. When looking at the cover, the open edges of horizontal and vertical format quarter-fold cards are always on the right and bottom edges.
Cards can be made from blank stationery for many occasions
The links below go to my Etsy shop where you can download cover artwork for cards. Also, here you will find pretty stationery paper with matching envelopes to have sent to your door.
- Blank Notes
- Thank You
- Photo
- Christmas
- Birthday
- Valentine
- Thinking of You
- I Love You
- Children
- Stamped Art
- Invitation—Any Event, Dinner or Party
- Wedding Card, Reception or Home Decor
- Baby Shower Invitation, Birth Announcement or Gift Card
- Birth Announcement, Baby Shower Invitation or Gift Card
- Congratulations
- Easter
- Anniversary Card or Party Invitation
- Sympathy, Loss, Sorrow
- Get Well, Hospital, Comfort, Make-up
- Announcement
- Recipe Cards
- Graduation, Job Change, Moving, Encouragement
- Sorry
- Monogram
- Save the Date (wedding, anniversary, retirement party, etc.)
- Let it Go
- Miss You
Sending or delivering a handmade card can brighten someone’s day (and yours, too). Make one now!


Wonderful tutorial. Your printable cards in your Etsy shop are just gorgeous, as are the family tree charts!
ReplyDeleteThanks Desiree. As of this week, it’s possible to download the card art instantly—handy when cards are needed quickly. The family tree charts are fun for Mother’s and Father’s Day.
Delete